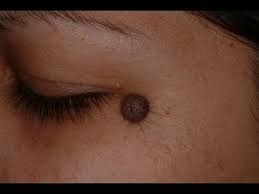
Mole Removal Step-by-Step Removal Guide
Moles are common skin growths that can appear anywhere on the body. While most moles are harmless, some individuals may choose to have them removed for cosmetic reasons or due to potential health concerns. If you’re considering mole removal, it’s essential to understand the process and what it entails.
The first step in mole removal is consultation with a dermatologist. A qualified dermatologist will examine the mole to determine whether it poses any health risks and discuss your options for removal. It’s crucial to ensure that the mole isn’t cancerous before proceeding with any treatment.
Once you’ve decided to remove a mole, there are several methods available depending on its size, type, and location. One of the most common methods is surgical excision, where the dermatologist numbs the area with a local anesthetic and then carefully cuts out the entire professional mole removal information along with a margin of surrounding skin using a scalpel or surgical scissors. This method is often used for larger moles or those suspected of being cancerous because it allows for thorough examination of tissue under a microscope.
Another popular technique is shave excision, which involves using a small blade to slice off the mole at skin level after numbing the area. This method typically leaves minimal scarring and is suitable for smaller moles that protrude above the skin surface.
For non-cancerous moles located superficially on the skin’s surface, laser removal might be an option. Laser treatment uses concentrated light beams to break down pigment within the mole cells without affecting surrounding tissue significantly. However, this method may require multiple sessions depending on how deep-rooted or pigmented your particular case might be.
After removing your unwanted blemish through whichever procedure you choose comes post-operative care: keeping wounds clean by washing gently twice daily; applying prescribed ointments like antibiotic creams if needed; covering treated areas loosely using bandages until healed completely (usually within two weeks). Avoid exposing affected regions directly under sunlight during recovery period since ultraviolet rays could cause discoloration/scarring issues later down line too!
Related Posts

How Irregular Eating Patterns Stress the Body
CBD Innovations That Will Transform Wellness in 2025